I finished my Sanity/Gatsby blog overhaul recently and couldn't wait to start writing.
But first I needed to deploy my Gatsby site and my Sanity content studio to Netlify. (Spoiler alert: Netlify's made this process super easy — I was able to get everything up and running in about an hour. 👏)
I wanted to document the steps I followed in this post in case it helps demystify this process for anyone else getting started.
Project Setup
A little background on my project setup: I'm working in a single GitHub repo which contains a /frontend directory for my Gatsby project and a /studio directory for my backend Sanity project.
(If you're working with two separate repos, these steps should work with minimal adaptation.)
Before You Start
If you're following along with these steps for your own project, there are a couple of things you should do before starting the steps below:
- Deploy your Sanity GraphQL endpoint by running
sanity graphql deploy - Push your frontend and backend projects to to GitHub
- Create a Netlify account and authorize Netlify to access your project repo(s)
- Collect your production environment variables — at a minimum you'll need your Sanity project ID and your Sanity dataset, but your project may have others
Step 1: Deploy the Gatsby site
Sign in to your Netlify account. Look for "New site from Git," and select the repo for your Gatsby project. (If you don't see your repo listed, or if you haven't authorized Netlify to access your GitHub account yet, you may need to configure your GitHub settings first.)
Next, you'll see a page with some site and build settings. There are a couple of important things to check here:
1. Select your "Branch to deploy."
Netlify will trigger a build anytime this branch updates. (Usually you'll want main.)
2. Look at the "Basic build settings."
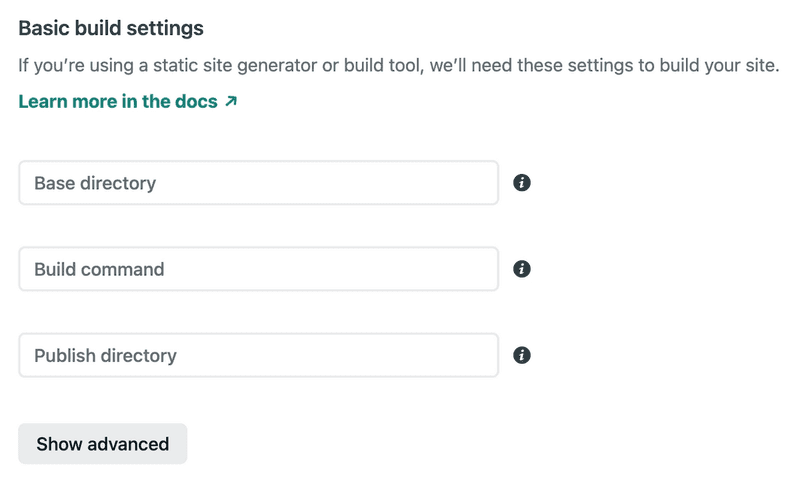
If your frontend and backend projects are in the same repo (like mine), you'll want to specify frontend (or the name of your Gatsby project directory) as the base directory here.
Next to build command, you'll also need to specify the build script from your package.json (mine was npm run build).
Publish directory is where Netlify looks for the build files, relative to the root of the repo. (Mine was frontend/public.)
3. Click "Show Advanced," then click "New variable."
You should add any variables from your .env here — to connect to Sanity you'll at least need your Sanity project ID and your Sanity dataset.
Now you're ready to Deploy site!
Step 2: Prepare the Sanity studio for Netlify's routing
Unlike your Gatsby project (which builds multiple static documents) the Sanity Studio is a React single-page application, which means we need to tell Netlify to redirect all route requests back to index.html.
In your Sanity project, create a new file called _redirects (no file extension) in the /static directory, with just one line of content:
/* /index.html 200Save and push to GitHub.
Step 3: Deploy the Sanity studio
Back under "Team overview" on Netlify, you're going to create another new site. This one should be linked to the repo where your Sanity backend project lives.
Repeat everything in Step 1, but this time you'll use your Sanity project's path and environment variables. (And note that Sanity defaults to a different build folder than Gatsby: dist.)
@sanity/cli is installed as a project dependency.Ready? Deploy site!
Step 4 (optional): Configure your custom domains
If you intend to set up a custom domain for your site or studio, this is the time to do it! Go to Site settings > Domain management, and look for the "Add a custom domain" button.
This step is going to be a little different depending on where your domain is registered. The easiest approach here is to register a domain through Netlify, but you can also set up your DNS settings yourself. (A separate post on how I make my Namecheap domains and Netlify play nice is coming soon.)
Step 5: Configure CORS
At this point if you've tried to visit your studio site, you may have noticed some pesky CORS errors. This is because we haven't authorized our deployed sites as CORS origins with Sanity yet!
Log in to Sanity.io and go to your project dashboard.
1. Allow your Sanity content studio
Scroll down until you see "CORS origins," then click "Add CORS origin," and enter the URL of your Sanity content studio. Make sure to check "Allow credentials" to allow your studio to read your Sanity auth token.
2. Allow your public Gatsby site
Click "Add CORS origin" again, and enter the URL of your public Gatsby site. If you're using the Sanity client to request any non-public content (for example, to support a post preview feature), you should check "Allow credentials" here.
That's it! Your sites should be able to load resources from Sanity now.
Step 6: Rebuild when you publish new content
At this point, your Gatsby site and Sanity studio should both be deployed, and both will rebuild whenever you make changes to the main branch in your GitHub repo.
But what happens if you publish new content through Sanity? You probably want your Gatsby site to rebuild automatically so you have that new content in your static pages. We can trigger that build by adding a Sanity content build hook to the Gatsby project.
In Netlify, go to your Gatsby frontend project, then click on the "Site settings" button, and find "Build and deploy." If you scroll down the page, you'll find a section called "Build hooks." Click "Add build hook" and connect it to your target branch (again, you'll most likely want main).
Save your hook, and you'll see the hook's URL appear. Copy that URL and go back to your project settings on Sanity.io. Scroll down to API settings > Webhooks and click "Add Webhook." Paste your hook's URL into the form, select the dataset for your project, and save.
That's it! Now your static site will rebuild whenever you publish new content on Sanity.
Step 7: Party time! 🎉
That's all, folks! You should now have a deployed public Gatsby site and a Sanity studio to author your site content. Have fun publishing!
More Resources

Chrissy Hunt is a software engineer in Brooklyn, NY who loves reading, writing, and chasing after her dog.